
Mastering the Art of Floating Shelves: Your Ultimate DIY Guide to Installation and Style
Floating shelves have become a cornerstone of modern interior design, offering a sleek, minimalist aesthetic that effortlessly enhances any living space. Their clean lines and understated elegance create an illusion of space, making rooms feel larger and more organized. Whether you’re looking to showcase cherished photographs, display decorative pieces, or simply add practical storage, floating shelves provide a stylish and functional solution. However, the thought of installing these elegant fixtures often brings a wave of apprehension, especially for those who consider themselves less than adept in DIY tasks. The idea of drilling into walls and ensuring perfect alignment can seem daunting, leading many to shy away from this otherwise fantastic home improvement.
But what if we told you that achieving that perfect, contemporary look is well within your reach, regardless of your perceived DIY skill level? Gone are the days when hanging a shelf meant wrestling with complex instructions and fearing irreversible mistakes. Thanks to readily available expert guidance, transforming your walls with beautiful floating shelves is now a manageable and rewarding project. This comprehensive guide, enriched by insights from professional services, will demystify the process, turning potential DIY anxieties into a sense of accomplishment.
Why Floating Shelves Are a Must-Have for Modern Homes
Before diving into the how-to, let’s appreciate why floating shelves continue to be a top choice for homeowners and designers alike. Their appeal extends far beyond mere aesthetics, offering a multitude of practical benefits:
Unmatched Aesthetic Appeal
Floating shelves are renowned for their ability to deliver a clean, uncluttered look. Without visible brackets or supports, they appear to float seamlessly against the wall, creating a sophisticated and contemporary vibe. This minimalist design integrates flawlessly with various interior styles, from Scandinavian and industrial to modern farmhouse and traditional, offering a versatile decorating element.
Maximizing Space and Minimizing Clutter
In smaller rooms or apartments, every inch of space counts. Floating shelves provide valuable vertical storage without taking up precious floor space, unlike traditional bookcases or cabinets. They are perfect for displaying items without making the room feel heavy or crowded, contributing to an open and airy atmosphere. They can transform an empty wall into a functional and beautiful display area, making them ideal for living rooms, kitchens, bathrooms, and bedrooms.
Versatility in Function and Display
The utility of floating shelves is incredibly diverse. In the kitchen, they can hold spices, cookbooks, or decorative dishware. In a home office, they offer quick access to supplies or a place for inspiring decor. For living areas, they become curated showcases for art, plants, or personal mementos. Their adaptability means you can use them for purely decorative purposes, essential storage, or a thoughtful blend of both, allowing your personality to shine through your home decor choices.
Ease of Customization and Personalization
Floating shelves come in an array of materials, finishes, and sizes, from rustic reclaimed wood to sleek, modern laminates and painted MDF. This variety allows for extensive customization to match your existing decor or create a striking contrast. You can choose from various lengths and depths, install them individually, or arrange them in unique patterns to create a dynamic wall display that is truly your own.
Getting Started: Essential Planning and Preparation
Successful DIY projects always begin with thorough planning. For floating shelves, careful preparation is key to ensuring stability, safety, and a flawless finish.
Choosing the Perfect Floating Shelf
The market offers a vast selection of floating shelves, each with unique characteristics. Consider the material – solid wood for durability and warmth, MDF/laminate for affordability and consistency, or glass for a modern, ethereal touch. Think about the shelf’s intended purpose and the weight it needs to hold. Heavier items will require more robust shelving and mounting hardware. Finally, align the shelf’s style and finish with your room’s overall aesthetic to ensure harmony.
Selecting the Ideal Location and Wall Type
The placement of your floating shelf significantly impacts both its functionality and visual appeal. Measure carefully to determine the optimal height and width, considering what will be placed on the shelf and any existing furniture. Critically, you must identify the type of wall you’ll be drilling into. Is it drywall, plaster, brick, or concrete? Different wall types require specific anchors and techniques. Always aim to mount into wall studs whenever possible for maximum stability and weight capacity, especially for heavier shelves or items.
Gathering Your Essential Tool Kit
Having the right tools on hand prevents frustration and ensures precision. Here’s a list of what you’ll typically need:
- Stud Finder: Indispensable for locating wooden studs behind drywall, providing the strongest mounting points.
- Spirit Level: Absolutely crucial for ensuring your shelf is perfectly horizontal. A digital level can offer even greater accuracy.
- Pencil and Tape Measure: For precise marking and measuring the shelf’s position.
- Drill and Drill Bits: A good quality drill with a set of bits appropriate for wood, drywall, and possibly masonry (depending on your wall type) is essential.
- Screwdriver (manual or power): To secure screws into brackets and anchors.
- Screws and Wall Anchors: Always use screws and anchors suitable for the weight of your shelf and its contents, and appropriate for your wall material. Toggle bolts or mollies are excellent for drywall where studs aren’t available.
- Safety Goggles: Protect your eyes from dust and debris during drilling.
- Dust Cloth: For cleaning up after drilling.
Safety First: A Non-Negotiable Step
Always prioritize safety. Wear your safety goggles to protect your eyes. Be mindful of electrical wires and plumbing pipes within walls; using a stud finder with AC detection can help identify wires. If in doubt, consult a professional or choose a different mounting location. Never overload your floating shelves beyond their recommended weight capacity, as this can lead to damage or injury.
Step-by-Step Installation: Hanging Your Floating Shelf Like a Pro
With planning complete and tools ready, it’s time to tackle the installation. We’ll break down the process into simple, manageable steps, drawing inspiration from expert DIY tutorials that aim to make these tasks accessible to everyone.
Step 1: Mark Your Desired Location
Hold the shelf against the wall at your desired height. Use your spirit level to ensure it’s perfectly straight, then lightly mark the top and bottom edges of where the shelf will sit with a pencil. If your shelf comes with a mounting bracket, hold the bracket in place and mark the screw holes.
Step 2: Locate Wall Studs for Maximum Security
For optimal support and weight capacity, always try to anchor your floating shelf into wall studs. Use your stud finder to scan the marked area horizontally. Once you locate a stud, mark its center line vertically. If the shelf is long, try to hit at least two studs. If studs aren’t conveniently located, you’ll need to rely on heavy-duty drywall anchors, ensuring they are rated for the weight you intend to place on the shelf.
Step 3: Drill Pilot Holes with Precision
Using the drill bit recommended for your screws and wall anchors, carefully drill pilot holes at your marked spots. If drilling into studs, ensure the pilot hole is slightly smaller than the screw diameter. For drywall anchors, drill holes according to the anchor manufacturer’s instructions, ensuring they are the correct size for a snug fit. Drill straight and avoid applying excessive force.
Step 4: Install Mounting Brackets or Anchors
If your floating shelf uses a hidden mounting bracket system (common for true floating shelves), attach the bracket to the wall using the appropriate screws, ensuring it is level and securely fastened. If you are using drywall anchors, insert them into the pilot holes according to their instructions – some tap in, others screw in. Once the anchors are in place, you’ll then screw the shelf or its internal support into these anchors.
Step 5: Mount the Floating Shelf
For shelves with hidden brackets, slide the shelf onto the bracket’s rods. Some designs might have small set screws on the underside to secure the shelf to the bracket. For shelves using external brackets or a simple screw-through method, align the shelf with the wall anchors/screws and secure it firmly. Double-check that all connections are tight and the shelf feels stable.
Step 6: Perform Final Checks and Adjustments
Once mounted, use your spirit level one last time to confirm the shelf is perfectly level. Gently apply some pressure to the shelf to test its stability. If there’s any wobbling or perceived instability, revisit the mounting points and tighten screws or reinforce anchors as needed. Small adjustments now can prevent big problems later.
Troubleshooting Common DIY Challenges
Even with careful planning, sometimes things don’t go exactly as expected. Here are a few common issues and how to address them:
- Shelf Isn’t Level: If it’s slightly off, check if a mounting screw needs tightening or if an anchor shifted. For minor adjustments, shims can sometimes be carefully placed behind the shelf if the design allows. Otherwise, you may need to re-drill a hole or adjust the bracket.
- Can’t Find Studs: If your stud finder isn’t cooperating, or studs aren’t where you need them, invest in high-quality toggle bolts or heavy-duty self-drilling drywall anchors. These can hold substantial weight in drywall, but always check their specific weight ratings.
- Drill Bit Slips: Before drilling, use a small nail or an awl to create a tiny indentation (a “starter hole”) at your pencil mark. This helps the drill bit grip and prevents it from wandering, especially on slick surfaces.
- Damaging the Wall: Accidents happen. For minor damage around a screw hole, spackle can usually fix it. For larger holes, a drywall patch kit might be necessary. Prevention is always best – measure twice, drill once, and use the correct drill bit size.
Beyond Installation: Styling Your Floating Shelves
Once your shelves are securely in place, the fun begins! Styling floating shelves is an art form that can dramatically elevate your room’s aesthetic. Here are some tips:
- Embrace the “Rule of Three”: Arrange items in odd numbers (usually three) for a visually appealing composition.
- Vary Heights and Textures: Mix tall and short items, and combine different materials like ceramics, wood, metal, and plants to add visual interest.
- Create Zones: Dedicate sections of your shelf to specific themes or colors to avoid a cluttered look.
- Incorporate Greenery: Small potted plants or trailing vines add life and freshness to your display.
- Consider Lighting: Small LED strip lights or puck lights underneath the shelves can create a beautiful ambiance and highlight your displayed items.
- Personalize It: Include items that tell your story – framed photos, cherished souvenirs, or books that reflect your interests.
Discover Expert Guidance with Handy’s Video Tutorial
For those who benefit most from visual instructions, the on-demand DIY services provider Handy has come to the rescue with an incredibly useful and reassuring resource. Recognizing that even seemingly small tasks like hanging a shelf can be daunting – a misplaced drill hole can indeed lead to a host of problems – Handy has developed a series of succinct, two-minute instructional videos.
These videos are specifically designed to break down common household DIY tasks into simple, actionable steps, ensuring your attempts are successful and stress-free. In the first installment of this series, Handy’s experienced handyman walks you through the entire process of hanging a floating shelf. The video meticulously highlights everything you need, from essential tools like a spirit level and drill to the correct screws and anchors. It then guides you through each stage of the shelf hanging process, making complex steps easy to understand and replicate.
Watch the video now for a clear, concise demonstration:
Curated Picks: Inspiring Floating Shelf Designs for Your Home
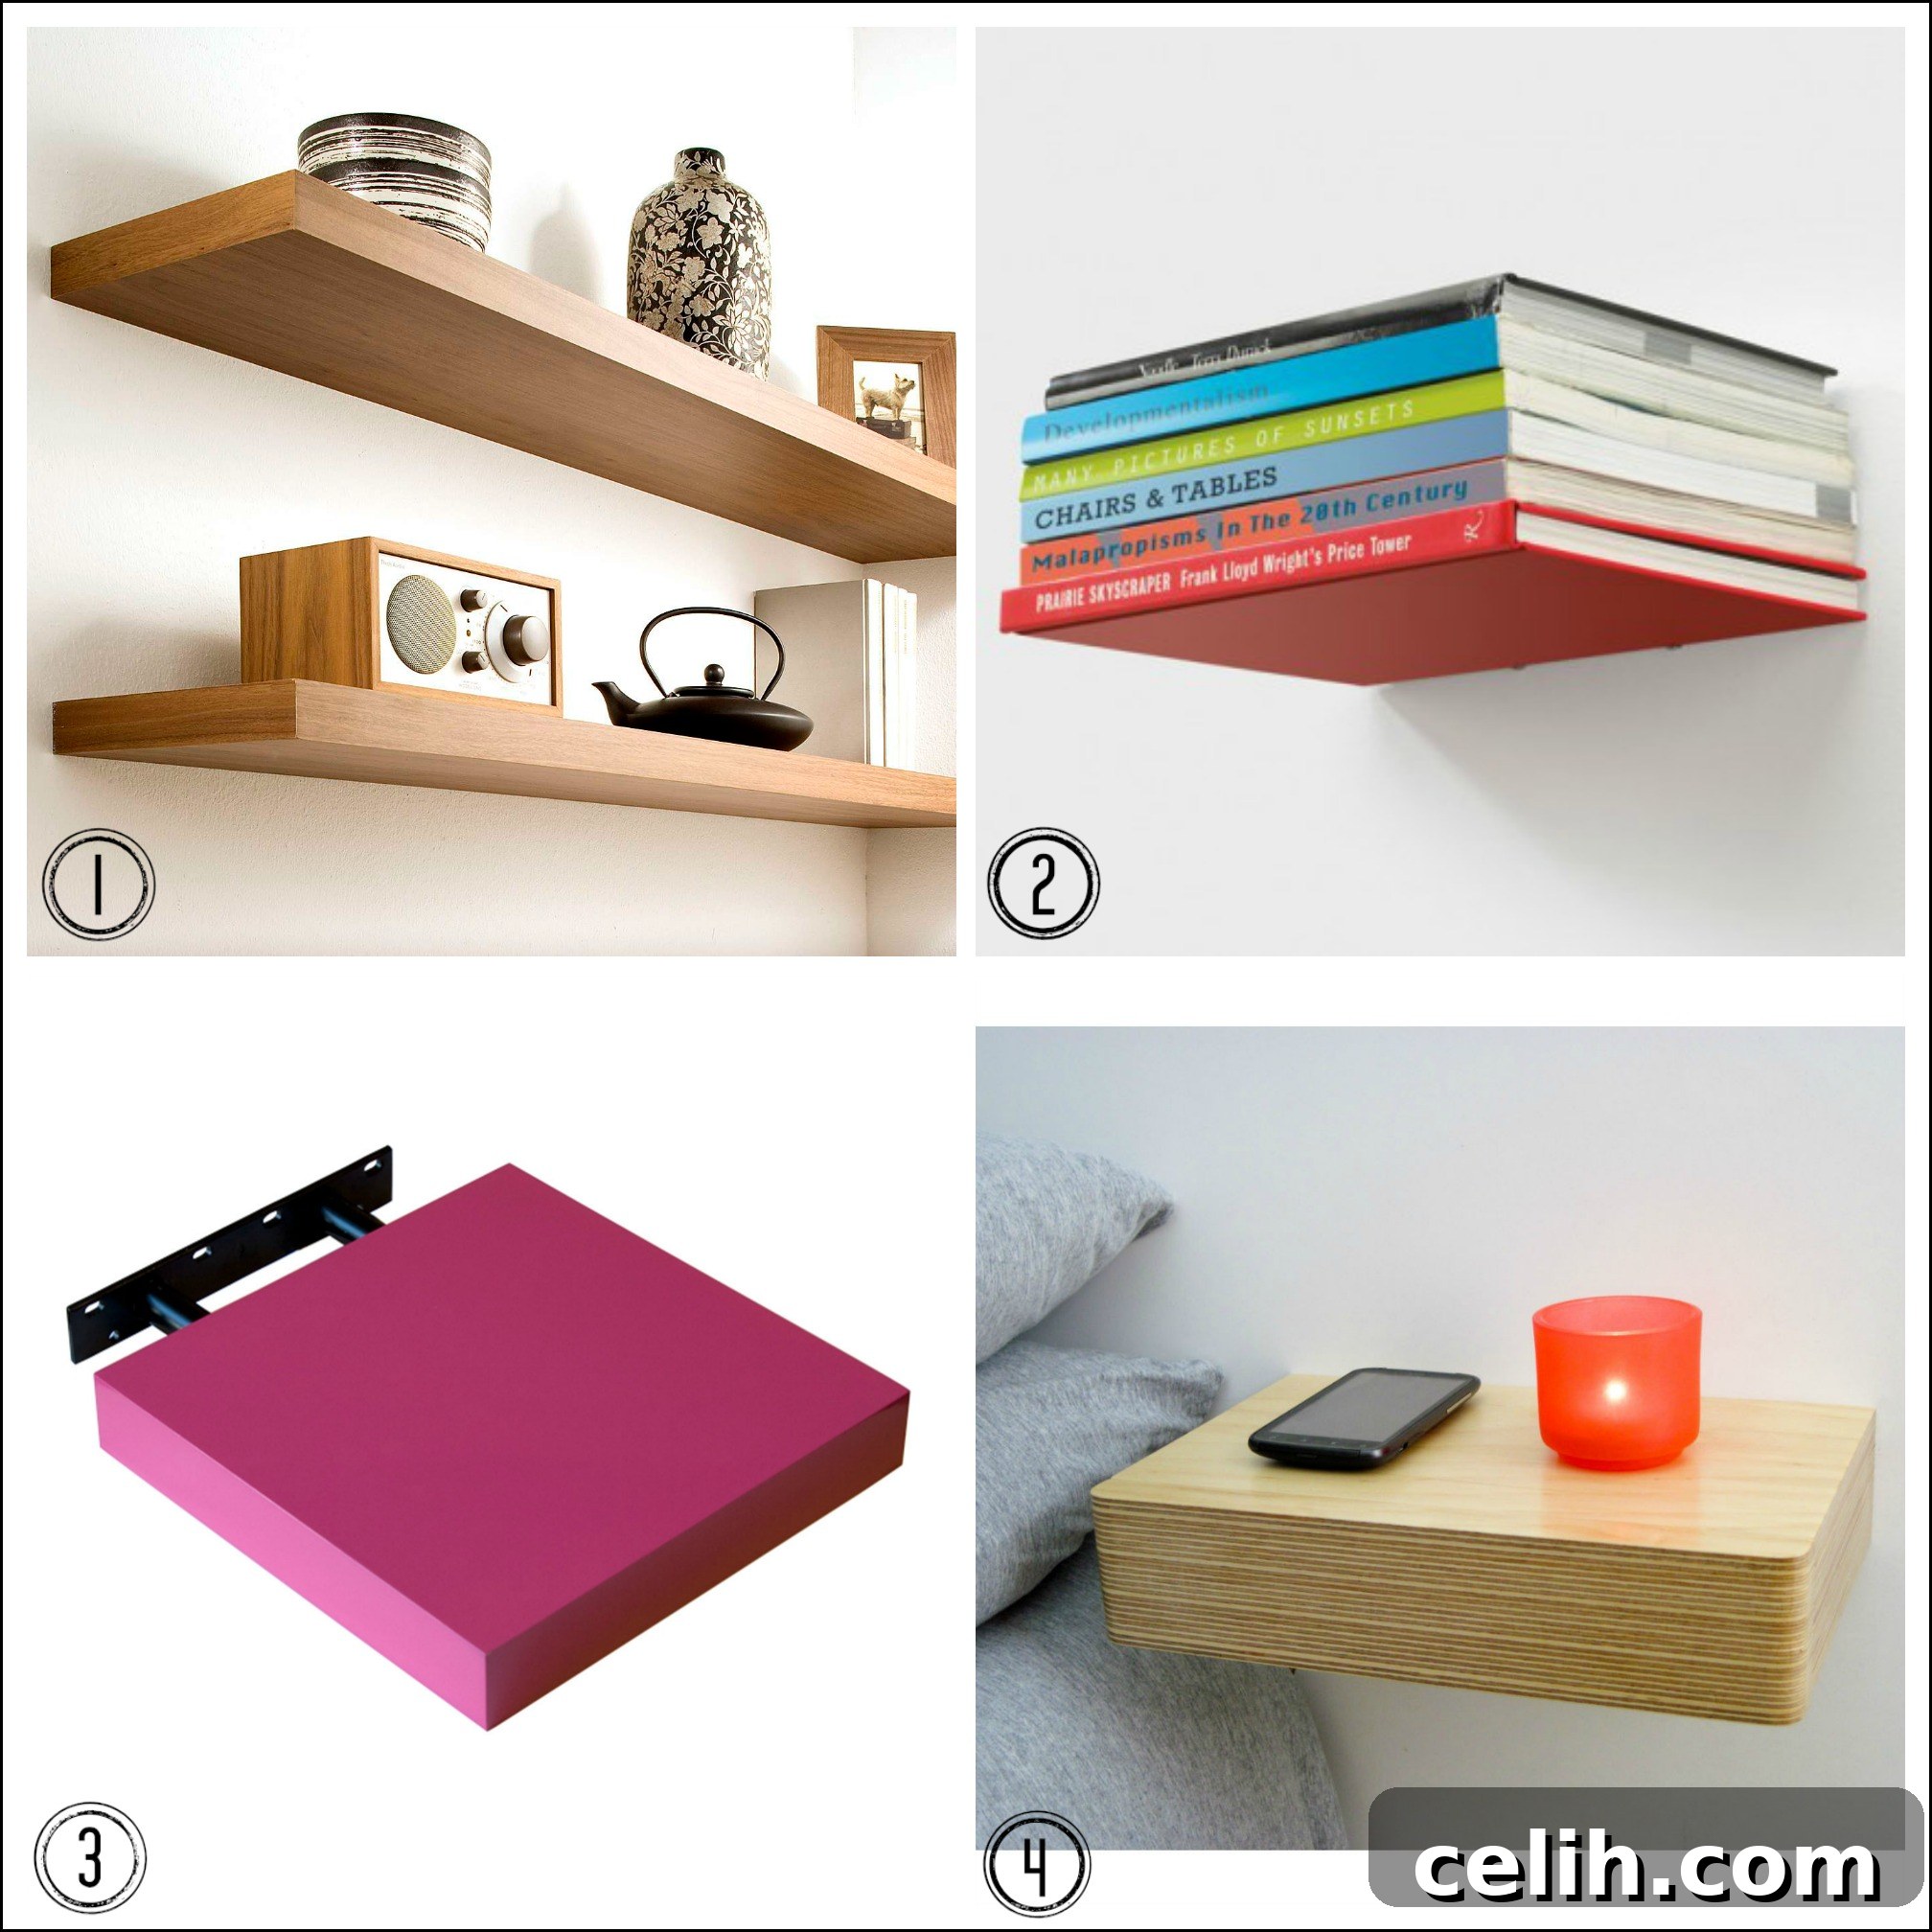
To further inspire your decorating journey, here are some examples of stylish floating shelves and related storage solutions that can bring a modern edge to any room:
- 1. Oak Effect Floating Shelf – Dunelm: A classic choice that brings warmth and natural texture to your walls, ideal for a cozy yet contemporary feel. Its versatile finish pairs well with a variety of color schemes and furniture styles.
- 2. Umbra Conceal Bookshelf – Red Candy: An ingenious design that creates the illusion of books floating directly on your wall. This minimalist solution is perfect for avid readers or those looking to add a touch of whimsy and unexpected functionality to their decor.
- 3. Hudson Pink Floating Shelf Kit – The Range: Inject a pop of color and personality with this vibrant pink floating shelf. Ideal for adding a playful touch to a child’s room, a creative studio, or simply to break up a neutral palette with a statement piece.
- 4. Pacco Floating Drawer – Mocha: Take the floating concept a step further with a floating drawer. This clever solution offers concealed storage, perfect for keeping small essentials out of sight while maintaining a clean, minimalist look. It’s a fantastic addition for entryways, bedside tables, or compact home office setups.
Conclusion: Empowering Your DIY Journey
The journey from admiring a beautifully styled floating shelf to confidently installing one in your own home is often shorter than you think. By following a systematic approach, understanding your tools, and leveraging expert guidance like Handy’s invaluable video tutorials, you can overcome any initial apprehension and achieve professional-looking results. Floating shelves are more than just storage; they are an expression of style, an enhancement of space, and a testament to your growing DIY capabilities.
So, take the plunge! Embrace the satisfaction of transforming your living space with these elegant, functional elements. With the right preparation and a clear step-by-step guide, you’ll not only master the art of hanging floating shelves but also gain the confidence to tackle many more home improvement projects in the future. Your perfect contemporary space is just a few simple steps and a confident drill away.