
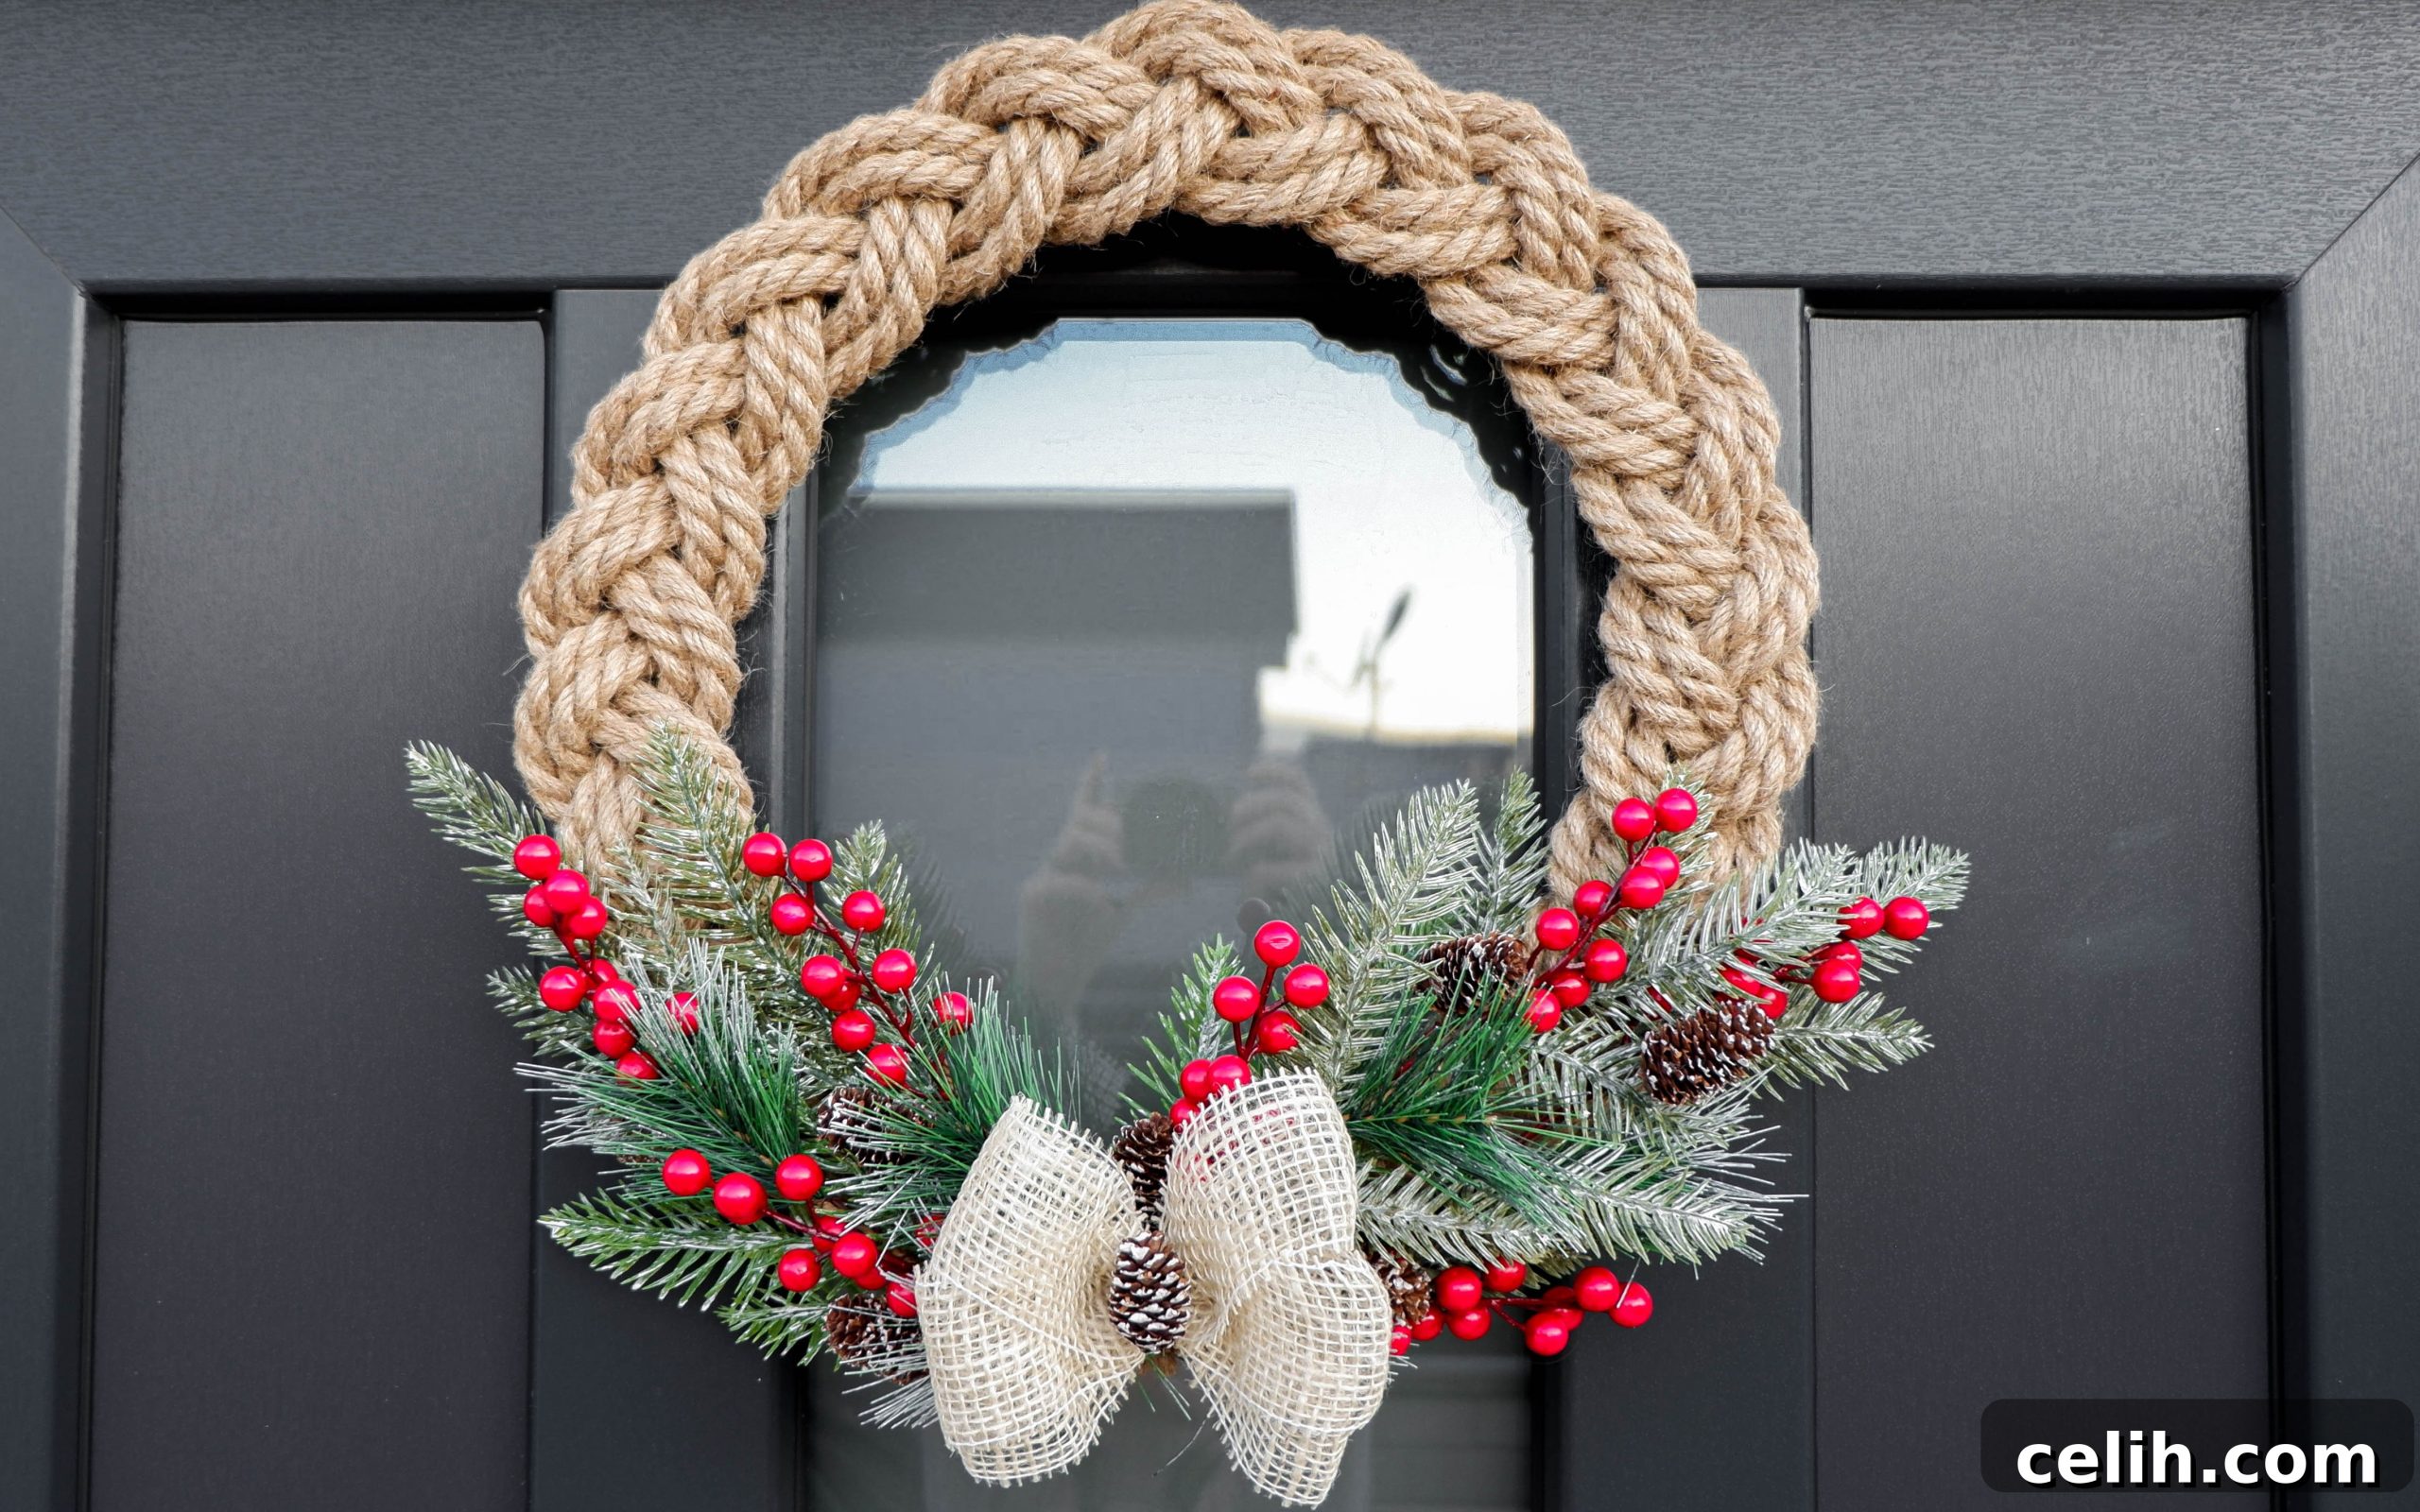
As the festive season approaches, there’s a unique joy in adorning your home with decorations that carry a personal touch. Imagine greeting guests with a beautiful, handmade wreath on your front door – a stunning declaration of holiday cheer crafted by you! While store-bought decorations are convenient, nothing quite compares to the warmth and character of a DIY project, especially when it comes to Christmas. If you’re looking for a relaxing yet rewarding activity this season, creating your own **DIY rope Christmas wreath** is an excellent choice. This project not only helps you unwind but also adds a rustic charm and bespoke elegance to your festive decor.
This comprehensive guide will walk you through every step of making a charming rope Christmas wreath using simple materials, many of which you might already have around your home. We’ll focus on jute rope, a fantastic material known for its natural texture and durability, lending an authentic, farmhouse-inspired look to your wreath. Forget the stress of holiday preparations for a moment and immerse yourself in the creative process. By the end of this tutorial, you’ll have a unique decoration that’s sure to garner compliments and bring a smile to your face. Let’s gather our supplies and begin this delightful crafting journey!

Crafting Your Own Rustic Charm: What You’ll Need for a DIY Rope Christmas Wreath
Before diving into the creative process, it’s essential to gather all your materials. Having everything at hand will ensure a smooth and enjoyable crafting experience. This list includes both the primary supplies and the crucial tools that will assist you in bringing your vision to life. Remember, while we’re suggesting specific items, feel free to adapt and personalize based on what you have available or your desired aesthetic.
- 9 Meters of 10mm Jute Rope: This is the star of our project. Jute rope offers a beautiful natural texture and a rustic feel, perfect for a Christmas wreath. The 10mm thickness provides a substantial base for the wreath. You might have some leftover from gardening or home renovation projects, making this an eco-friendly craft.
- 1.5m Wire: A sturdy wire is crucial for creating the foundational circular shape of your wreath. Floral wire or a similar gauge of craft wire will work well. We’ll be using it to form a robust frame.
- 1m Jute Burlap: Burlap adds another layer of rustic charm, especially when fashioned into a bow. You can choose a natural shade or a colored burlap to match your existing decor.
- Clear Tape (or any kind of strong tape): Tape will be used temporarily to secure your rope while braiding, ensuring it stays in place on your work surface. Masking tape or painter’s tape also works.
- Decorated Garland: This is where you can infuse a splash of festive color and texture. Choose a garland with small faux berries, leaves, or glitter that complements your desired look. You’ll be cutting pieces from this.
- Pinecones (optional): Natural elements like pinecones are wonderful for adding an organic, wintery touch. You can collect these from outdoors (ensure they are clean and dry) or purchase craft pinecones.
- Hot Glue Gun and Glue Sticks: An indispensable tool for securing various elements of your wreath. Ensure you have plenty of glue sticks on hand. Safety first – always use a hot glue gun with caution.
- Sharp Scissors: Essential for cutting rope, burlap, and garland precisely.
Having these items ready will set you up for a successful and satisfying DIY experience. Don’t be afraid to substitute decorations; sprigs of artificial holly, small ornaments, or even dried orange slices can add a unique flair to your personalized wreath.
Step-by-Step Guide: How to Craft Your Beautiful Rope Christmas Wreath
Now that your materials are assembled, it’s time to embark on the creative journey of constructing your own stunning rope Christmas wreath. Follow these detailed steps carefully, and you’ll soon have a bespoke decoration ready to hang. This process is designed to be enjoyable and straightforward, even for beginner crafters.
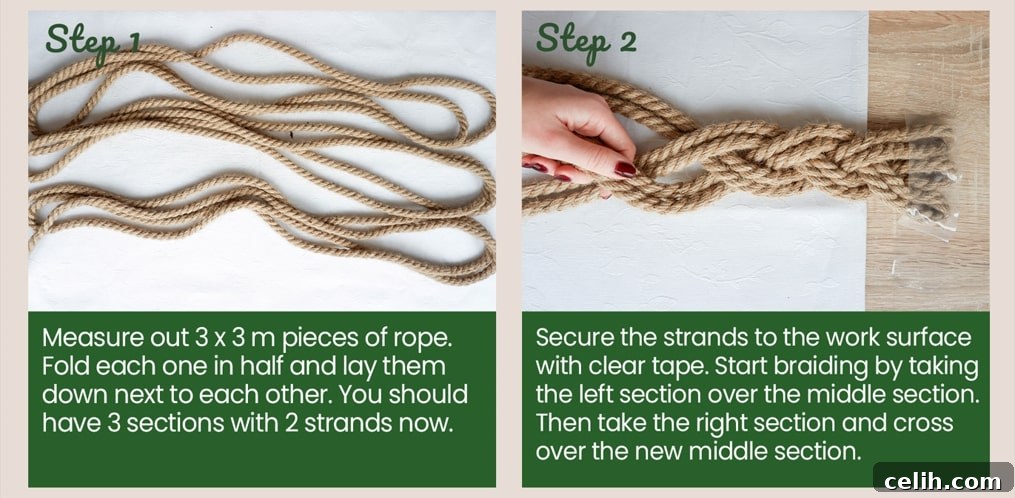
Step 1: Preparing and Braiding Your Jute Rope
The foundation of your wreath is a beautifully braided jute rope. Start by uncoiling your 9 meters of jute rope. To create a substantial braid, you’ll need to divide and fold the rope strategically. Fold each piece of rope in half twice, creating six individual strands that are roughly equal in length. This means you will effectively have three sections, each comprising two strands of rope. Lay these three sections side-by-side on a clean, flat work surface. Use your clear tape to firmly secure the very end of these six strands to your table or countertop. This anchoring point is crucial for maintaining tension and ensuring a tight, even braid. Once secured, begin braiding the rope as you would a three-strand braid, treating each pair of strands as a single unit. Continue braiding until you reach the opposite end of your rope, making sure to keep the tension consistent throughout to achieve a uniform thickness.
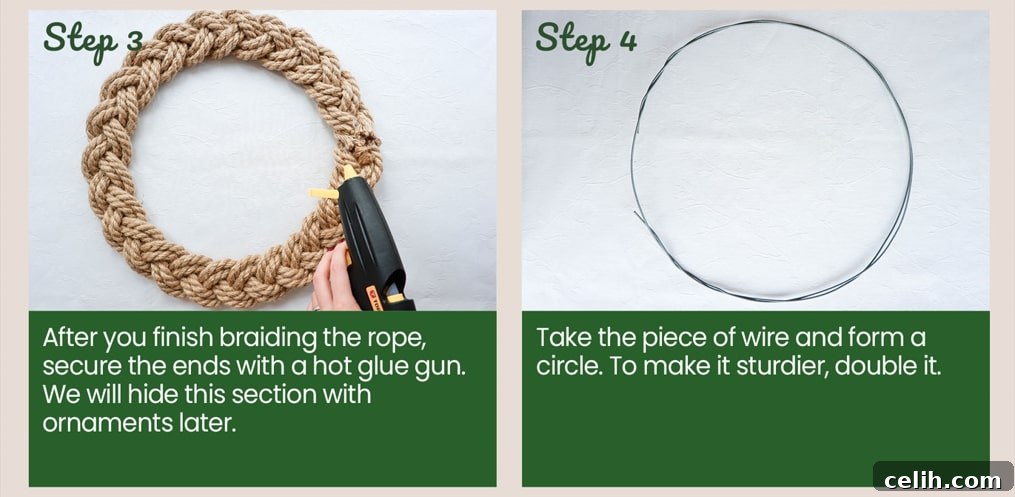
Step 2: Securing the Braided Rope Ends
Once your rope is fully braided, it’s essential to secure the ends to prevent unraveling. Carefully remove the tape from the initial end, and apply a generous amount of hot glue to both ends of the braided rope. Press the glued ends firmly together or against themselves to create a secure, permanent bond. Hold them in place for a few moments until the glue has cooled and set. This step ensures the integrity of your braid and prepares it for forming the wreath shape.
Step 3: Creating the Sturdy Wire Frame
Now, take your 1.5-meter length of wire. This wire will serve as the internal frame, providing stability and helping your wreath maintain its circular shape. Bend the wire into a perfect circle, aiming for the desired diameter of your finished wreath. For added sturdiness and to prevent the wreath from losing its shape over time, it’s highly recommended to double up the wire. Simply wrap the wire around itself to create a stronger, thicker ring. You can twist the ends together to securely close the circle, ensuring there are no sharp edges protruding.
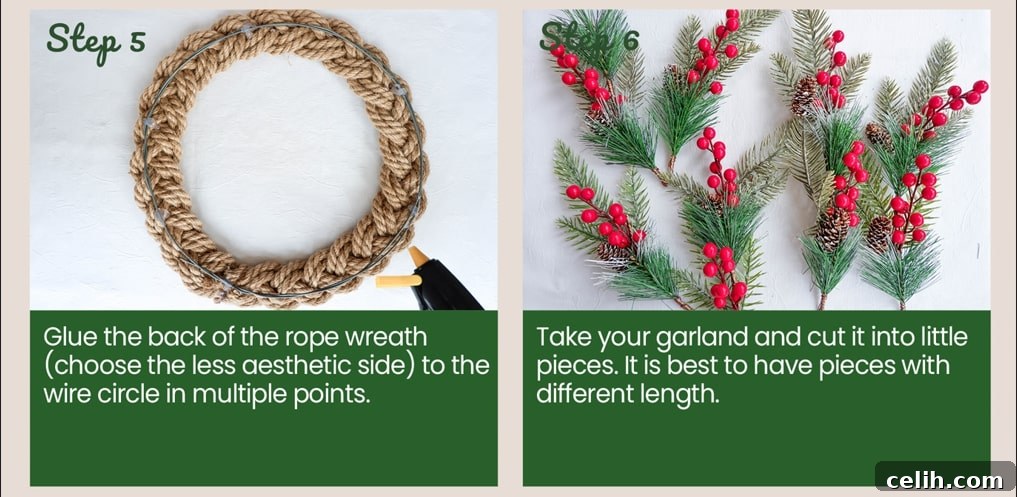
Step 4: Attaching the Braided Rope to the Wire Frame
With your sturdy wire circle ready, it’s time to bring your braided rope into its final form. Carefully position the braided rope around the wire circle. Ensure that one side of the braid is facing outwards (this will be the front of your wreath). Turn the rope over so that the back side is facing up. Using your hot glue gun, apply a continuous bead of glue along the back of the braided rope and press it firmly onto the wire circle. Work in small sections to prevent the glue from drying too quickly, ensuring a strong and even bond all the way around. This step transforms your braided rope into the classic wreath shape and forms the robust base for all your upcoming decorations.
Step 5: Decorating Your Wreath Base with Garland
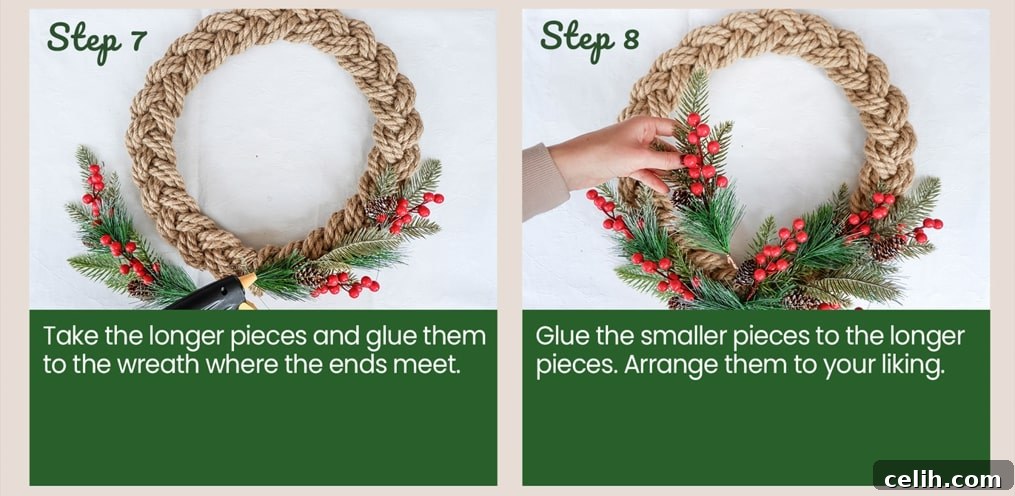
Now comes the most exciting part – decorating! This is where your creativity truly shines. For this particular project, we’re using pieces of a cut-up garland to add a festive touch. Begin by snipping your garland into various lengths. Start by gluing the longer pieces of garland around the wreath, evenly distributing them to create a foundational layer of greenery. Use your hot glue gun, applying glue to the back of the garland pieces and pressing them onto the braided rope. The goal is to cover the rope base tastefully, allowing some of the natural jute texture to peek through. Feel free to experiment with the density and placement until you are satisfied with the initial coverage.
Step 6: Layering and Refining Your Decorations
Once the longer garland pieces are in place, begin adding shorter pieces on top. This layering technique adds depth and dimension to your wreath, making the decorations look fuller and more professional. Continue adding decorative elements until you achieve the desired fullness and visual balance. This is your opportunity to truly personalize your wreath. Consider incorporating other small ornaments, artificial berries, or even small baubles. The key is to step back periodically and assess your progress, ensuring the decorations are evenly distributed and aesthetically pleasing. Don’t be afraid to adjust or rearrange pieces before the glue fully sets.
Step 7: Crafting the Burlap Bow
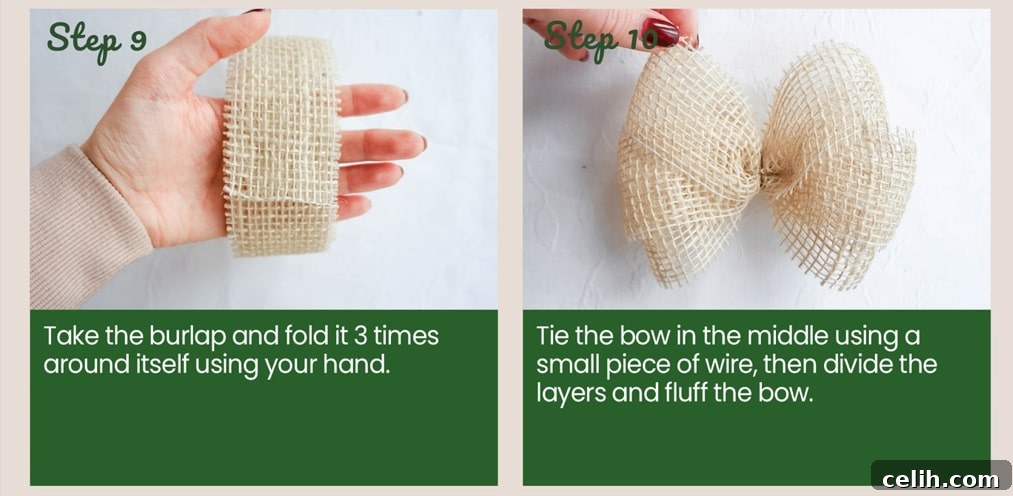
A beautiful bow is often the crowning glory of a Christmas wreath. To make a rustic burlap bow, take your 1-meter piece of jute burlap. Fold the burlap three times lengthwise, creating a thick, rectangular strip. Pinch the folded burlap in the middle to create the classic bow shape. Secure this pinched center by wrapping a small piece of wire tightly around it, twisting the ends at the back to hold it firmly. Once secured, gently fluff out the loops of the bow until you are happy with its volume and symmetry. You can trim the ends of the burlap to create a neat finish or give them a swallowtail cut for extra flair.
Step 8: Final Assembly and Embellishments
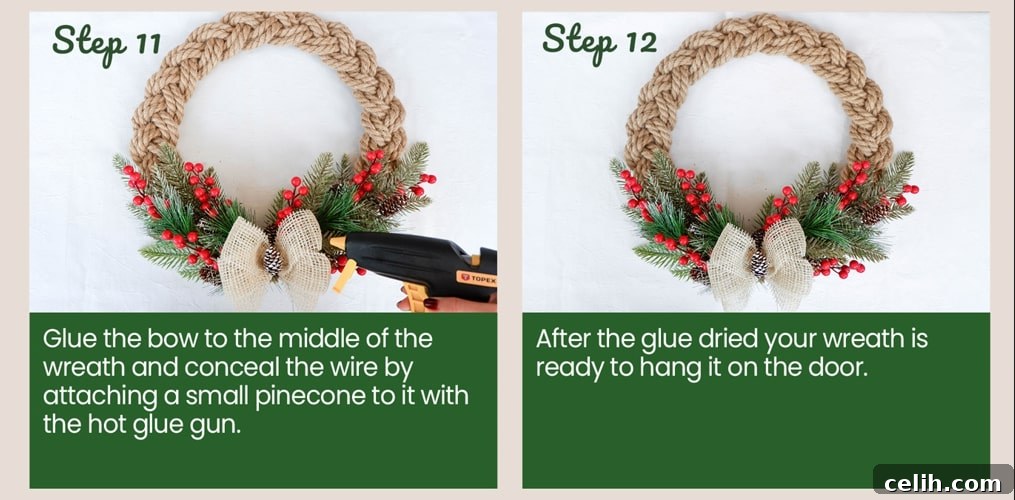
With your bow ready, it’s time to attach it to your wreath. Choose a prominent spot, usually the bottom center or slightly offset, and apply a generous amount of hot glue to the back of the bow. Press it firmly onto the decorated wreath, holding it until the glue is set. To further enhance the rustic appeal and to cleverly conceal the wire used to secure the bow, you can glue a small pinecone directly on top of the bow’s center. This adds a charming natural touch and gives your wreath a polished finish. Feel free to add any other small final touches, such as a sprinkle of artificial snow or glitter, for that extra festive sparkle.

Congratulations! If you’ve diligently followed these steps, you now possess your very own rope Christmas wreath – a testament to your creativity and crafting prowess. Hang it proudly on your front door, above your fireplace, or on any wall that could use a touch of festive warmth. Be prepared for the compliments and inquiries about your unique, handmade decoration!
Tips for Customization and Longevity
- Varying Rope Types: While jute offers a rustic look, feel free to experiment with other rope materials like cotton rope for a softer aesthetic or even sisal for a different texture.
- Size Matters: Adjust the length of your rope and wire to create wreaths of different sizes, perfect for various display areas around your home.
- Color Schemes: Beyond traditional red and green, consider garlands and ribbons in shades of silver and blue for a wintry wonderland theme, or gold and cream for an elegant, vintage feel.
- Natural Additions: Incorporate cinnamon sticks, dried orange slices, or small bundles of eucalyptus for beautiful aromas and an authentic natural look.
- Lighting It Up: For an extra magical touch, wrap a string of battery-operated LED fairy lights around your finished wreath.
- Storage: To ensure your beautiful wreath lasts for many Christmases to come, store it in a cool, dry place, ideally in a wreath storage box or wrapped gently in tissue paper.
Creating handmade decorations like this DIY rope Christmas wreath is more than just a craft; it’s an experience that enriches your holiday season with personal meaning and artistic expression. It’s an opportunity to create lasting memories and beautiful pieces that reflect your unique style. So, light a festive candle, put on some holiday music, and let your creativity flow. We hope this tutorial inspires you to embrace the joy of DIY this Christmas and beyond.
For more inspiring DIY Christmas craft ideas and guides on other kinds of wreaths, be sure to explore our additional resources:
- DIY Chicken Wire Christmas Tree
- 10 Quick and Easy DIY Christmas Tree Decorations
Happy crafting and happy holidays!