
As Valentine’s Day approaches, the air fills with anticipation for moments of cherished connection and heartfelt gestures. What better way to express your love than through a meticulously prepared meal, culminating in a dessert that speaks volumes? Forget the last-minute stress; this year, create an unforgettable culinary experience with two delightful, yet surprisingly simple, make-ahead desserts designed to impress. These recipes are not just about food; they’re about crafting a romantic atmosphere, allowing you to focus on your loved one rather than being chained to the kitchen. We’ve curated a selection of super-easy puddings and treats that promise gasps of admiration and prove that gourmet doesn’t have to mean complicated. Even better, their prepare-ahead nature means you can dedicate your Valentine’s Day to pure romance, enjoying every moment without culinary pressure. From the silken richness of chocolate mousse to the buttery crumb of heart-shaped shortbread, these indulgent recipes are your secret weapon for a truly special celebration.
Velvet Indulgence: Quick & Easy Rich Chocolate Mousse for Two
There’s something inherently romantic about a classic chocolate mousse. Its smooth, airy texture and intense chocolate flavor make it a quintessential dessert for intimate occasions. This recipe delivers a luxurious experience with minimal effort, making it ideal for a romantic evening. The key to its success lies in quality ingredients and careful, yet straightforward, execution. Prepare to enchant your beloved with this decadent delight, showcasing your culinary thoughtfulness without the fuss.
Ingredients for a Perfect Chocolate Mousse:
- 120g High-Quality Dark Chocolate: Opt for chocolate with at least 70% cocoa solids. The quality of your chocolate directly impacts the depth and richness of your mousse. Investing in premium chocolate, with its complex notes and smooth melt, is absolutely worth it for a truly sublime flavor experience that elevates the entire dessert.
- 2 Large Fresh Eggs: Eggs provide the essential structure and airy lightness for the mousse. Ensure they are fresh, and whenever possible, choose free-range for superior flavor and ethical sourcing.
- 1 Tablespoon of Liqueur (Optional): A splash of a complementary liqueur can add a sophisticated twist. Brandy offers warmth, Cointreau or another orange-flavored liqueur beautifully enhances chocolate, or you could try a coffee liqueur for depth. Alternatively, a few drops of high-quality orange essence or pure vanilla extract can be used for a non-alcoholic option, providing subtle aroma and flavor.
Before you begin your culinary adventure, a crucial tip for optimal volume and a perfectly light mousse: allow your eggs to come to room temperature. Take them out of the refrigerator at least 30 minutes before you plan to start cooking. Room temperature eggs whip up higher, incorporate more air, and emulsify better, leading to a lighter, fluffier mousse with a more stable structure. This simple, often overlooked step can make a significant difference in the final texture and overall success of your dessert.
Crafting Your Chocolate Masterpiece: Step-by-Step Guide
The journey to a perfect chocolate mousse begins with meticulous preparation and a dash of patience. Start by carefully separating the eggs, ensuring not a single speck of yolk contaminates the whites. Even a tiny amount of fat from the yolk can prevent the whites from whipping up properly. Place the whites in one impeccably clean, dry bowl (any grease will hinder whipping) and the yolks in another. Set them aside for now; their moment will come to shine.
Next, it’s time to transform the chocolate. Break your high-quality dark chocolate into small, uniform pieces. This ensures even melting and prevents scorching. Place these pieces into a heatproof bowl. While a microwave offers speed and convenience, you can also use a double boiler (a bowl set over a saucepan of simmering water) for a gentler, more controlled melt, which many pastry chefs prefer for delicate chocolate. If using a microwave, heat in short, controlled 30-second intervals on a low to medium power setting. After each interval, remove the bowl and stir thoroughly. Chocolate retains its shape even when melted, so stirring is crucial to check its consistency and distribute heat, preventing hotspots and scorching. Continue this process until the chocolate is smooth, glossy, and completely melted. Once melted, stir in your chosen liqueur or flavoring, if using, until fully combined and fragrant. Allow this rich chocolate mixture to cool slightly; it should be warm to the touch but not hot. A hot mixture would risk cooking the egg yolks you’re about to add, leading to a grainy or scrambled texture instead of a silky, luscious one. Once cooled to a comfortable warmth, beat in the egg yolks, one at a time, until the mixture is beautifully uniform, slightly thickened, and boasts a rich, consistent color.
Now, for the magic that gives mousse its signature airiness: whipping the egg whites. Using an electric mixer or a stand mixer with a whisk attachment, begin beating the egg whites on medium speed, gradually increasing to medium-high. Continue until they form stiff, glossy peaks. This means when you lift the whisk, the peaks should stand upright without drooping, indicating maximum air incorporation. Be careful not to overbeat, as they can become dry, crumbly, and difficult to fold, potentially compromising the mousse’s smooth texture. The voluminous, airy texture created here is paramount for a truly light and ethereal mousse.
The final, delicate step is folding. With a large metal spoon or a flexible rubber spatula, carefully fold about a third of the whipped egg whites into the chocolate mixture. This initial portion lightens the denser chocolate mixture, making it easier to incorporate the remaining whites without deflating them. Then, gently add the rest of the egg whites, folding them in with a light, upward motion, sweeping from the bottom of the bowl upwards, turning the bowl as you go. The goal is to incorporate the whites fully while preserving as much of the precious air as possible. Over-mixing will deflate the whites and result in a dense, heavy mousse, losing its characteristic lightness. Continue until no streaks of white remain and the mixture is uniformly light, airy, and fluffy.
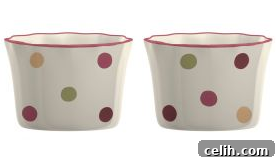
Once perfectly combined, spoon the exquisite mixture into two elegant glasses, ramekins, or small dessert dishes. For optimal setting and flavor development, cover them lightly with plastic wrap or foil and place them in the refrigerator for at least 30 minutes, or ideally, several hours or even overnight. The longer they chill, the firmer the mousse will become, and the flavors will have more time to meld and deepen. Just before serving, unleash your creativity with decorations: a dollop of freshly whipped cream, delicate chocolate shavings curled from a bar, a dusting of sifted cocoa powder, a sprig of fresh mint, or a few vibrant fresh raspberries can transform your mousse into a visual and culinary masterpiece. For a touch of rustic charm and elevated presentation, consider serving your mousse in charming ceramic ramekins, like the Katie Alice Highland Fling Ramekins. These delightful dishes, often available in sets, elevate the presentation, turning a simple dessert into a memorable, visually appealing experience that speaks of thoughtful preparation.
To further enhance the romantic ambiance and complete your dessert presentation, accessorize your perfect pudding with cute, heart-topped spoons. These charming utensils are not just practical for savoring every creamy bite, but they also add a whimsical, thematic touch that perfectly complements the loving sentiment of Valentine’s Day. Their thoughtful design and ideal size for dessert make each spoonful an even more special experience, transforming a simple meal into an enchanting occasion. A set of four, like those delightful options often found at specialty gift stores such as My Gift Tree, ensures you’re well-equipped for a romantic dessert for two, with spares readily available for future celebratory moments or unexpected guests.
A Taste of Love: Delightful Heart-Shaped Shortbread Biscuits
While the chocolate mousse provides a rich and elegant climax to your meal, these charming heart-shaped shortbread biscuits offer a buttery, crumbly counterpart that’s equally enchanting and a delightful addition to any romantic spread. Perfect for serving alongside the mousse, with a post-dinner coffee or tea, or simply as a thoughtful, standalone treat, shortbread holds a special place in the world of comfort baking. Its inherent simplicity is its greatest strength, allowing the pure, unadulterated flavors of high-quality butter and fine sugar to shine through. These biscuits aren’t just delicious; when cut into festive heart shapes, they become a tangible, edible expression of care and affection, making them perfect for Valentine’s Day.
Essential Ingredients for Buttery Shortbread:
- 125g Unsalted Butter: The cornerstone of exceptional shortbread. Always use high-quality unsalted butter (never margarine or butter substitutes) as it contributes significantly to the characteristic rich flavor, tender texture, and delightful melt-in-your-mouth quality that defines authentic shortbread.
- 55g Caster Sugar: This fine-grain sugar blends seamlessly into the butter, ensuring a smooth, uniform dough and contributing to the delicate crispness of the baked biscuit without adding excessive sweetness.
- 180g Plain Flour: All-purpose flour is perfect for shortbread, providing the necessary structure and body without making the biscuits tough. For an even more tender crumb, some bakers prefer to substitute a small portion (e.g., 20-30g) of the plain flour with cornflour or rice flour.
For the best results and the easiest dough to work with, start with softened butter. Leave your butter out at room temperature for at least 30 minutes to an hour, or until it’s pliable to the touch but not melted or oily. This makes it significantly easier to cream with the sugar, leading to a smoother, more aerated dough. Before you begin mixing, preheat your oven to 190 degrees Celsius (375 degrees Fahrenheit) to ensure it’s ready and at the correct temperature for baking as soon as your dough is prepared.
Baking with Love: Shortbread Preparation Steps
The magic of shortbread lies in its straightforward yet precise preparation, yielding incredibly satisfying results. In a large mixing bowl, combine the softened butter and caster sugar. Beat them together vigorously with a sturdy wooden spoon or an electric mixer until the mixture is light, fluffy, and visibly pale in color. This crucial creaming process incorporates air into the butter and sugar, which contributes significantly to the shortbread’s characteristic tender, crumbly texture. Ensure the mixture is well aerated before moving on.
Once the butter and sugar are perfectly creamed, gradually add the plain flour to the bowl. Begin mixing with a spoon to incorporate most of the flour, then switch to using your fingertips to gently work the flour into the buttery mixture. The warmth of your hands will help bring the dough together into a cohesive mass. Be gentle but thorough; the goal is to combine the ingredients until a soft, uniform dough forms. It might seem crumbly at first, but keep gently pressing and bringing it together. Avoid overworking the dough, as excessive kneading can develop the gluten in the flour, resulting in tough, chewy biscuits instead of the desired delicate, crumbly texture. The dough should be soft, pliable, and just come together without being sticky.
Turn the dough out onto a lightly floured surface. With a rolling pin, gently roll the dough to an even thickness of approximately 0.5cm (about 1/4 inch). Achieving a uniform thickness is paramount for even baking, ensuring all your biscuits cook consistently without some burning while others remain undercooked. Now, for the fun and festive part: using your chosen heart-shaped biscuit cutter, press firmly and cleanly into the rolled dough to create your beautiful heart shapes. Carefully transfer these delicate biscuit hearts to a greased baking tray (or one lined with parchment paper), leaving a little space between each one to allow for slight expansion and even heat circulation during baking.
Bake your shortbread in the preheated oven for approximately 15 minutes. The key is to bake them until they are just tinged a very pale golden color around the edges; they should not turn dark brown. Their beauty and traditional texture lie in their subtle golden hue and tender crumb, so watch them closely as ovens can vary considerably. Once baked to perfection, carefully transfer the hot biscuits to a wire rack to cool completely. Cooling on a rack ensures proper air circulation all around the biscuits, preventing them from becoming soggy and allowing them to crisp up beautifully.
Once completely cooled, your heart-shaped shortbread biscuits are ready for their delightful finishing touches. A simple dusting of icing sugar (confectioners’ sugar) adds a classic, elegant finish that enhances their sweetness and appearance. For a more decorative and indulgent flair, melt small amounts of high-quality white and dark chocolate separately, then artfully drizzle them over the cooled biscuits using a spoon or a piping bag with a fine nozzle. You can also add colorful sprinkles, a touch of edible glitter, or even a few carefully placed sugar pearls for extra sparkle and charm. One of the greatest advantages of shortbread, especially for make-ahead convenience, is its excellent keeping quality. These biscuits can be made three or four days in advance and stored perfectly in an airtight container at room temperature. Just remember to hide them well if you want them to last until your special Valentine’s Day celebration!
To achieve perfectly uniform and charming heart shapes every single time, investing in a high-quality set of cookie cutters is a wise choice for any enthusiastic baker. We highly recommend durable stainless steel cutters, especially those thoughtfully designed with a comfortable, molded top to protect your fingers while pressing firmly into the dough. These sturdy tools, like the versatile set often found at specialized kitchenware shops or online retailers such as The Oak Room, are built to last for many romantic baking sessions to come. They ensure your Valentine’s biscuits are always a picture of perfection, adding a professional touch to your homemade treats.
For an unforgettable presentation that truly elevates your baked creations, arrange your beautiful shortbread biscuits on an exquisite cake stand. A designer stand, such as one crafted by renowned Ukrainian artist Nina Jarema, transforms your table into a captivating display, showcasing your baking efforts with maximum visual impact. A stunning cake stand not only serves a functional purpose by presenting your treats elegantly but also acts as a sophisticated decorative centerpiece, adding a touch of elegance, height, and undeniable charm to your romantic spread. Available from curated homeware boutiques like Cloth Ears, such a piece is an investment in both timeless style and the creation of truly memorable moments that will impress your loved one.
This Valentine’s Day, make a truly heartfelt statement with these two exquisite, yet incredibly manageable, dessert recipes. The rich, velvety chocolate mousse and the delightful, buttery heart-shaped shortbread biscuits are more than just treats; they are profound expressions of love and dedication, thoughtfully prepared and beautifully presented. Their make-ahead convenience is a true blessing, ensuring you can genuinely savor the precious moments with your loved one, free from the last-minute kitchen rush and stress. By focusing on high-quality ingredients, embracing simple yet effective techniques, and adding a touch of elegant presentation, you’ll undoubtedly create a memorable culinary experience that will be cherished long after the last bite. Indulge in the pure joy of baking, the profound delight of sharing, and the unparalleled beauty of a truly romantic and stress-free celebration.