
Embrace Winter’s Charm: Bake Your Own Enchanting Snowflake Cookies
As the frosty breath of winter settles in and snow blankets the landscape, there’s an undeniable allure to retreating indoors. What better way to transform a chilly afternoon into a cozy, memorable experience than by filling your home with the comforting aroma of freshly baked goods? Baking offers a unique blend of creativity, warmth, and delicious rewards, making it the perfect antidote to the winter chill. Imagine the joy of gathering with loved ones, flour dusting the counters, and the promise of sweet treats on the horizon. This season, let’s dive into the heartwarming world of winter baking, focusing on a truly magical creation: the snowflake cookie.
Snowflakes, with their intricate and unique designs, symbolize the beauty and wonder of winter. Translating this delicate artistry into an edible form brings a special kind of delight. Snowflake cookies are not just treats; they are tiny edible pieces of art that capture the essence of the season. They are perfect for festive gatherings, thoughtful homemade gifts, or simply as a special indulgence on a quiet evening by the fire. Whether you’re a seasoned baker or just starting your culinary journey, crafting these beautiful cookies is a rewarding experience that warms both the kitchen and the soul.
Discover the Magic of Giant Snowflake Cookie Cutters
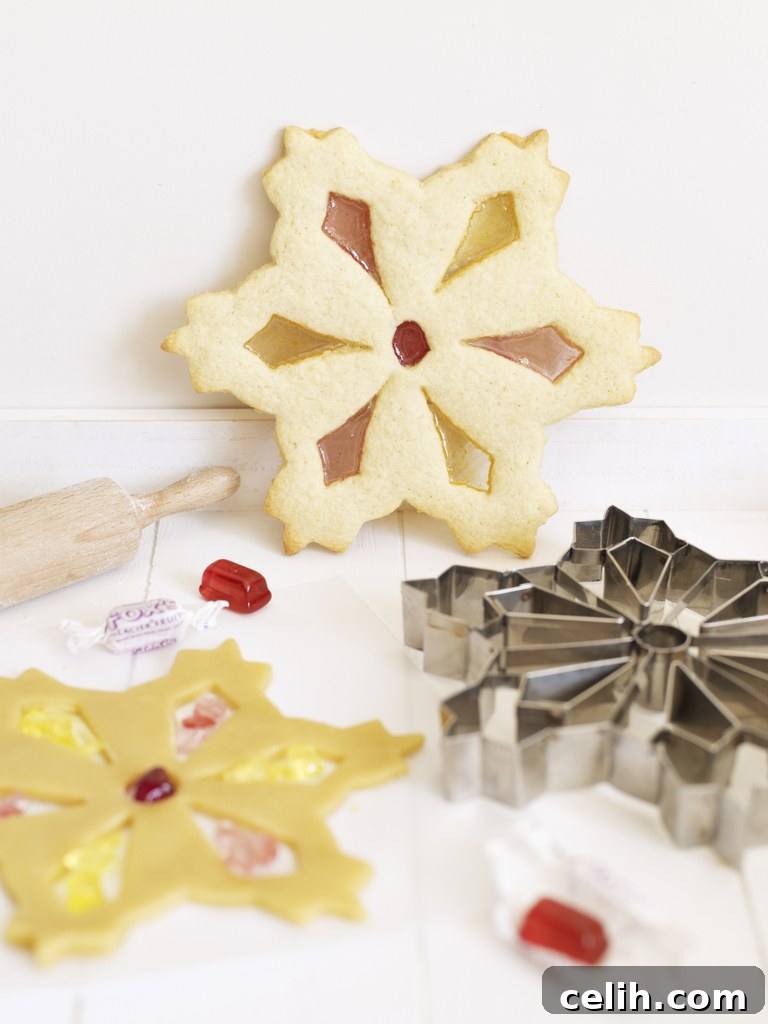
To truly capture the grandeur of winter’s delicate masterpieces, a truly exceptional tool is required. We are absolutely enchanted by the idea of these giant snowflake cookie cutters. These aren’t just any cookie cutters; their generous size and intricate design elevate your baking from simple to spectacular. What makes them particularly captivating is their potential to create stunning stained-glass effects, transforming ordinary cookies into edible jewels with just the addition of some simple boiled sweets.
Crafted with remarkable attention to detail, these meticulously designed cutters boast a substantial diameter of 19cm. This impressive size ensures that each cookie you produce will be a substantial, eye-catching masterpiece, perfect for making a statement on any dessert platter or as a standalone treat. The intricate patterns within the snowflake design are not merely decorative; they provide the perfect framework for a variety of decorating techniques, especially the dazzling stained-glass method.
Create Dazzling Stained Glass Snowflake Cookies: A Step-by-Step Guide
The stained-glass effect is where these giant snowflake cutters truly shine. This technique involves creating a translucent “window” within your cookie, filled with melted hard candy, resulting in a beautiful, jewel-like finish that catches the light. It’s an unexpectedly simple process that yields incredibly impressive results, sure to astound your family and friends. Here’s how you can achieve this magical effect:
Ingredients and Equipment:
- Your favorite roll-out cookie dough recipe (sugar cookies or shortbread work best)
- Hard boiled sweets (e.g., fruit drops, butterscotch) in various colors
- Giant snowflake cookie cutters (like those from Cox and Cox)
- Parchment paper
- Baking sheets
- Rolling pin
- Small ziplock bags or a food processor for crushing candy
- Small metal cookie cutter (optional, for inner cut-out)
The Process:
- Prepare Your Dough: Begin by preparing your chosen roll-out cookie dough. Ensure it’s well-chilled, as this makes it easier to handle and prevents spreading during baking. Roll out the dough evenly on a lightly floured surface or between two sheets of parchment paper to about 1/4 inch thickness.
- Cut Your Shapes: Use the giant snowflake cookie cutter to cut out the main shapes. Carefully transfer these dough snowflakes to a baking sheet lined with parchment paper.
- Create the “Window”: This is the crucial step for the stained-glass effect. If your snowflake cutter has an inner cutout, use that. Otherwise, use a smaller, simple metal cookie cutter (like a small circle, star, or even a smaller snowflake) to cut out a “window” from the center of each dough snowflake. Carefully remove the inner dough piece. Ensure the edges of the window are clean.
- Prepare the “Glass”: Unwrap your hard boiled sweets and separate them by color if desired. Place each color into its own small ziplock bag and crush them into fine pieces using a rolling pin or a meat mallet. Alternatively, a food processor can quickly pulverize them. The finer the pieces, the smoother the “glass” will be.
- Fill the Windows: Spoon the crushed candy into the empty “windows” of your dough snowflakes. Be careful not to overfill; the candy will melt and spread. Aim for an even, thin layer of candy within the cutout.
- Bake to Perfection: Preheat your oven according to your cookie dough recipe instructions (typically around 350°F or 175°C). Bake the cookies for about 8-12 minutes, or until the edges of the cookies are lightly golden and the crushed candy has completely melted and appears smooth and glossy. The candy will bubble a bit – this is normal.
- Cool and Marvel: Once baked, carefully remove the baking sheets from the oven. Let the cookies cool completely on the parchment paper on the baking sheet. Do not attempt to move them until they are fully cooled and the candy has hardened. As they cool, the melted candy will solidify into a beautiful, translucent, glass-like pane. Once firm, gently peel them off the parchment paper.
Tips for Success:
- Don’t Overfill: Too much candy can seep under the cookie or create an overly thick center.
- Parchment Paper is Key: It prevents the melted candy from sticking to the baking sheet.
- Consistent Dough Thickness: Ensures even baking for both the cookie and the candy.
- Chill Dough Again: If your kitchen is warm, chill the cut-out cookies with the candy filling for 10-15 minutes before baking to help them hold their shape.
- Experiment with Colors: Use different colored candies for vibrant effects. Clear candies can create a beautiful frosty look.
Beyond Stained Glass: Other Creative Decorating Ideas
While the stained-glass effect is undeniably captivating, these large snowflake cookies offer a canvas for a multitude of other creative decorating possibilities. Their size and intricate design lend themselves beautifully to various techniques:
- Classic Royal Icing: Decorate with delicate patterns of royal icing, mimicking the crystalline structure of real snowflakes. Use fine tips for intricate lines, or flood sections for a smooth, elegant finish. Edible glitter or silver dragées can add a touch of sparkle.
- Simple Glaze and Sprinkles: A quick and easy option is a simple vanilla or almond glaze. Drizzle it over the cooled cookies, then immediately dust with white, silver, or blue sprinkles, or even edible iridescent glitter for a magical shimmer.
- Dusting of Sugar: For a minimalist yet elegant look, simply dust your cooled snowflake cookies with a generous amount of powdered sugar. This creates a beautiful “freshly fallen snow” effect.
- Chocolate Drizzle: A drizzle of melted white chocolate or dark chocolate can add both flavor and visual appeal, especially when contrasted with a lighter cookie base.
The Joy and Benefits of Home Baking
Baking at home, especially during the colder months, is more than just a culinary activity; it’s an experience that nourishes the senses and strengthens connections. The act of baking snowflake cookies, from rolling the dough to witnessing the candy melt and harden, is inherently therapeutic and mindful. It offers a wonderful opportunity for family bonding, allowing children to participate in a fun and educational activity while creating cherished memories.
Beyond the delightful taste, homemade cookies offer numerous benefits. You have complete control over the ingredients, allowing you to choose high-quality components and adjust for dietary preferences or restrictions. The unparalleled freshness of a cookie straight from your oven simply cannot be matched by store-bought alternatives. And, of course, there’s the incredible aroma – a symphony of vanilla, butter, and sugar that permeates your home, instantly creating a warm, inviting, and utterly comforting atmosphere.
Choosing the Right Baking Tools for Your Culinary Adventures
Investing in quality baking tools, like these giant snowflake cookie cutters, can significantly enhance your baking experience and the quality of your results. When selecting cookie cutters, consider materials such as stainless steel for durability and rust resistance, or sturdy plastic for ease of use, especially with children. A good cookie cutter should have clean, sharp edges to ensure well-defined shapes, and be comfortable to hold and press. Proper care, such as hand washing and thoroughly drying, will ensure your tools last for many seasons of joyous baking.
Where to Find These Enchanting Cutters
For those eager to embark on their own snowflake cookie adventure, these particular giant snowflake cookie cutters are available at Cox and Cox. We’re thrilled to note that they are currently part of a sale, priced at an attractive £9.10. This makes it an opportune moment to acquire a tool that promises to bring so much creative joy and deliciousness to your kitchen throughout the winter season and for many years to come.
So, as the days grow shorter and the air turns crisp, why not make the most of the indoor season? Embrace the warmth of your kitchen, unleash your inner baker, and craft a batch of these exquisite giant snowflake cookies. Whether you opt for the dazzling stained-glass effect or adorn them with elegant icing, these cookies are sure to bring a touch of winter magic and a whole lot of delicious cheer to your home. Happy baking!