
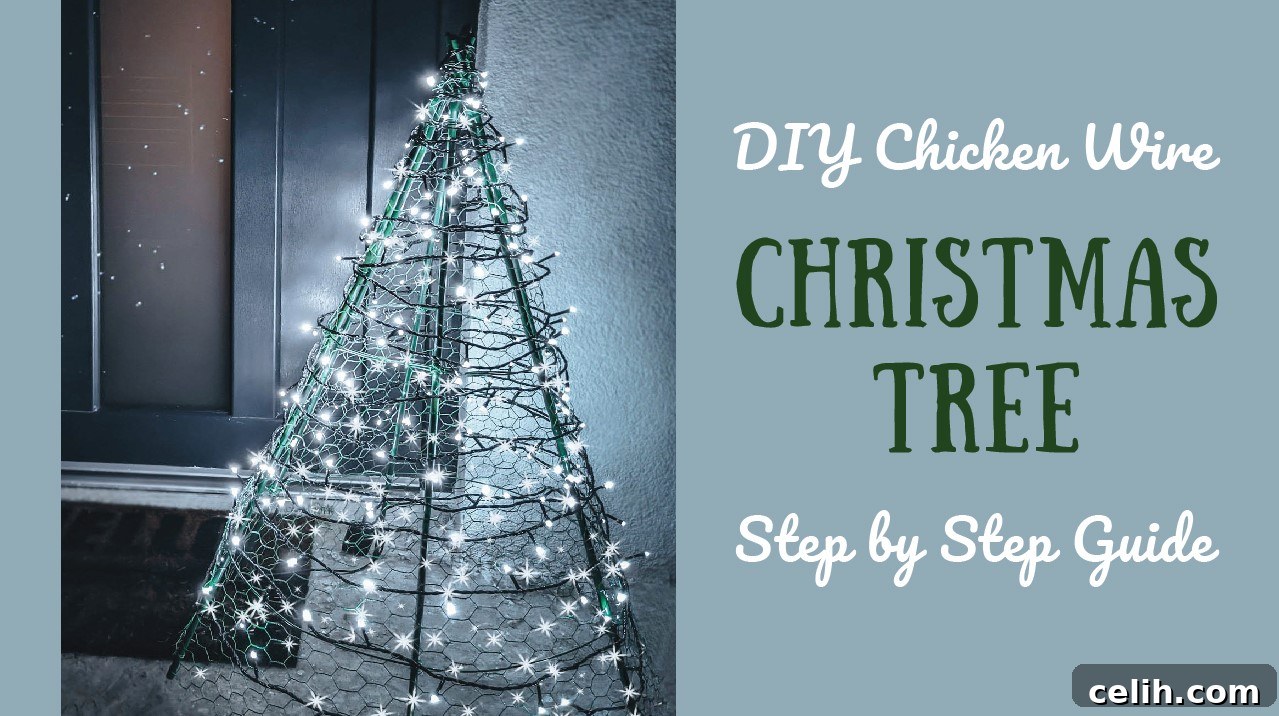
Craft Your Own Stunning Wire Christmas Tree: A DIY Guide for Festive Outdoor & Indoor Decor
As the festive season draws near, the air fills with anticipation and the joy of holiday decorating. While traditional Christmas trees remain a beloved classic, there’s a growing trend towards more sustainable, unique, and customizable alternatives. These innovative designs not only offer an eco-friendly approach to holiday cheer but also provide an exciting opportunity to infuse your personal style into your seasonal decor. If you’re looking to make a distinctive statement this year, whether to complement your traditional setup or to create a completely fresh look, a handmade wire Christmas tree is an excellent choice. This versatile project allows you to craft a durable, weather-resistant, and endlessly customizable decorative piece that can beautifully adorn either your indoor living space or your outdoor landscape. Imagine a twinkling, shimmering tree that you’ve brought to life with your own hands – a truly unique centerpiece for your holiday celebrations.
This guide will walk you through the process of creating your very own chicken wire Christmas tree. It’s a rewarding DIY project that combines simplicity with creative freedom, allowing you to design a holiday decoration that perfectly matches your vision. Whether you prefer a minimalist design or an elaborate, sparkling display, this wire tree provides the perfect canvas. Made from readily available materials, it’s a cost-effective solution that promises to brighten your home and garden for many seasons to come. Let’s gather our supplies and transform ordinary wire into extraordinary festive magic!
Why Choose a DIY Wire Christmas Tree?
Opting for a handmade wire Christmas tree offers a myriad of benefits that extend beyond mere aesthetics. This alternative provides a thoughtful and practical solution for modern holiday decorating.
- Eco-Friendly & Sustainable: Unlike cut trees that contribute to deforestation and waste, or artificial trees made from plastics that aren’t biodegradable, a wire tree is a sustainable choice. It’s reusable year after year, reducing your environmental footprint and eliminating the need for annual tree purchases. You can easily store it and bring it out each holiday season, knowing you’re making an environmentally conscious decision.
- Unleash Your Creativity: The beauty of a wire tree lies in its incredible versatility. It acts as a blank canvas, inviting you to experiment with various themes, colors, and textures. You can paint the wire itself, wrap it in fabric, or adorn it with an array of lights and ornaments. This project allows for endless personalization, ensuring your tree truly reflects your unique taste and holiday spirit.
- Durability & Weather Resistance: Crafted from sturdy chicken wire and stakes, these trees are designed to withstand the elements. This makes them an ideal choice for outdoor decoration, where they can bravely face wind, rain, or snow without losing their charm. Indoors, their robust construction ensures they remain stable and beautiful throughout the entire holiday season.
- Cost-Effective: The materials required for this project are relatively inexpensive and widely available. By investing a little time and effort, you can create a stunning holiday decoration for a fraction of the cost of purchasing a high-quality artificial tree or repeatedly buying fresh-cut trees.
- Space-Saving & Versatile Placement: Wire trees can be designed in various sizes, making them suitable for any space. Whether you have a sprawling garden, a cozy balcony, or a compact living room, you can tailor the dimensions to fit perfectly. Their open structure also creates a sense of lightness, preventing them from overwhelming smaller areas.
- Unique Aesthetic: Stand out from the crowd with a decoration that sparks conversation. A wire Christmas tree offers a contemporary and artistic twist on traditional holiday decor, adding a touch of modern elegance and intrigue to your festive display.
What You’ll Need to Get Started:
Before diving into the construction of your magnificent wire Christmas tree, it’s essential to gather all the necessary materials and tools. Having everything at hand will ensure a smooth and enjoyable crafting experience. Here’s a detailed list of what you’ll need:
- Chicken Wire (120cm x 150cm): This is the primary material for your tree’s mesh structure. Chicken wire is pliable enough to shape but sturdy enough to hold its form. Consider the mesh size; smaller mesh offers a denser look and more surface area for decorations, while larger mesh gives a more open, airy feel.
- 6x Stakes (90cm long each): These stakes will form the foundational skeleton of your tree, providing stability and its initial conical shape. Wooden dowels, metal rods, or sturdy bamboo stakes are good options. Ensure they are strong enough to support the wire and any decorations.
- Christmas Lights (15m long): Lights are crucial for bringing your wire tree to life. LED lights are recommended for their energy efficiency and cool-to-the-touch nature. Choose warm white for a classic glow or multi-colored for a playful look. Consider outdoor-rated lights if your tree will be placed outside.
- Tying Wire (2.5m long): Also known as florist wire or craft wire, this thin, flexible wire is used for securing the chicken wire to the stakes, reinforcing joints, and attaching larger decorations. Choose a gauge that is easy to manipulate but strong enough for secure fastening.
- Lacing Wire: Similar to tying wire but often thinner and more delicate, lacing wire is perfect for finer details, weaving edges, and attaching smaller ornaments with precision.
- Spray Paint (preferably green): While optional, spray painting the chicken wire can give your tree a more traditional “evergreen” appearance. Green is a popular choice, but silver, white, gold, or even vibrant colors can create unique effects. Ensure the paint is suitable for outdoor use if applicable and allow for proper ventilation during application.
- Working Gloves: Essential for protecting your hands from the sharp edges of the chicken wire and stakes. Safety should always be a priority.
- Wire Cutters/Pliers: Necessary for cutting and bending the chicken wire and tying wires. A good quality pair will make the job much easier and safer.
- Measuring Tape or Ruler: For precise measurements when cutting the wire and positioning the stakes.
With these items gathered, you’re ready to embark on your creative journey. Get your working gloves on, clear a spacious area, and prepare to craft something shiny, unique, and truly magical!
Step-by-Step Guide to Making Your Wire Christmas Tree
Crafting your own wire Christmas tree is an exciting and rewarding project. Follow these detailed steps to build a sturdy and beautiful festive display.
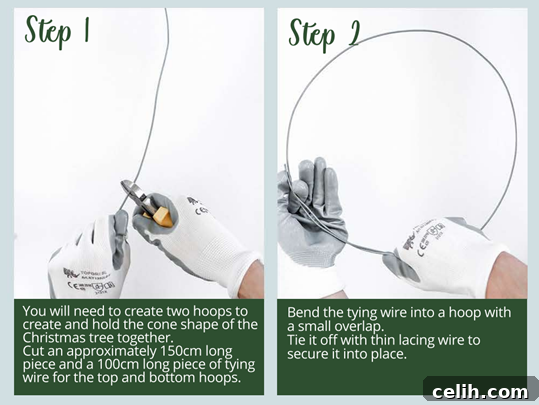
Step 1: Create the Stable Base Structure
The first and most crucial step is establishing a firm and secure base for your tree. This foundation will dictate the stability and overall shape of your finished creation. Begin by taking your six stakes. Arrange them on the ground or a flat surface to form a symmetrical hexagonal or star-shaped base. The goal is to create a wide, stable bottom that tapers upwards. Once you’re satisfied with the arrangement, firmly drive each stake into the ground or secure them together at the base using your tying wire. Ensure they are equally spaced and create a strong, unyielding foundation. This initial framework will prevent your tree from wobbling or toppling over, especially if it’s destined for outdoor display.
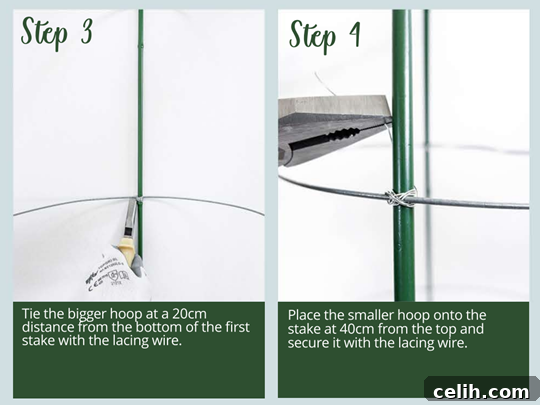
Step 2: Form the Conical Skeleton
With the base secured, it’s time to bring the stakes together to form the iconic cone shape of a Christmas tree. Carefully draw the tops of the stakes inwards, meeting them at a central point to create the apex of your cone. Once they converge, securely bind them together using more tying wire. Double-check that all stakes are taut and that the cone structure feels robust. Don’t worry if the shape isn’t absolutely perfect at this stage; minor imperfections can be charmingly concealed later with lights and decorations. The key here is to establish a strong, symmetrical skeletal framework that will support the chicken wire mesh.
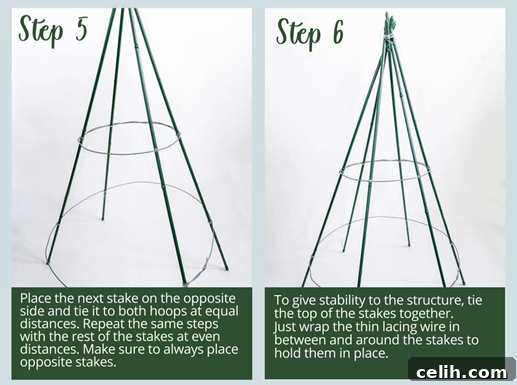
Step 3: Prepare the Chicken Wire
Now, with your conical frame ready, it’s time to prepare the chicken wire. Unroll the chicken wire carefully, keeping your working gloves on to protect your hands from the sharp edges. Depending on the size of your cone and the dimensions of your chicken wire, you might need to trim it. Aim for a piece that is long enough to wrap around the circumference of your cone at the base and tall enough to reach the apex, with some overlap for securing. A rough estimate can be made by measuring the base circumference and the height of your stake structure. Having a slightly larger piece is better, as excess can be trimmed later.
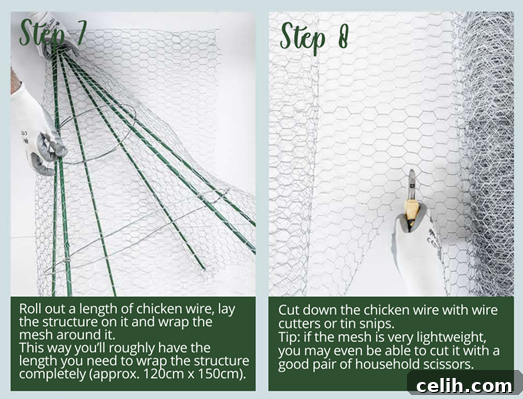
Step 4: Secure the Chicken Wire to the Structure
With the chicken wire cut to an approximate size, begin wrapping it around your conical stake structure. Start from the base and work your way up, ensuring the wire is snug against the stakes. Use your tying wire and lacing wire to secure the chicken wire firmly to the stakes at regular intervals. Pay close attention to the seams where the wire overlaps; secure these tightly to create a continuous, seamless surface. Use a ruler or measuring tape to ensure the wire is evenly distributed and that the cone maintains its shape as you attach the mesh. The goal is a tightly wrapped mesh that mimics the conical form of a Christmas tree.
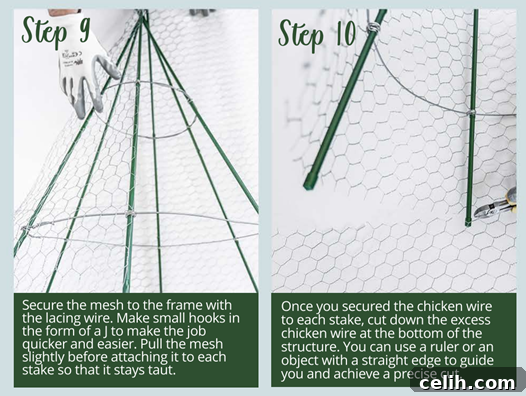
Step 5: Refine the Shape and Apply Spray Paint
Once the chicken wire is fully attached and secure, take a moment to refine the overall shape. Trim any excess wire using your wire cutters, ensuring there are no sharp protrusions. Gently push and pull the mesh to correct any inconsistencies and achieve a smooth, appealing conical shape. Now, if you opt for a colored tree, it’s time for spray painting. Choose a well-ventilated area, lay down a drop cloth, and apply your chosen spray paint (e.g., green for a traditional look, silver for a modern touch). Apply multiple light coats rather than one thick coat to avoid drips and ensure even coverage. Allow each coat to dry completely before applying the next. This step truly transforms the raw materials into a festive masterpiece.
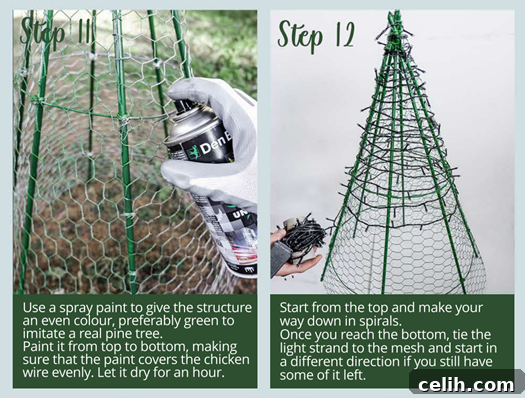
Step 6: The Joy of Decorating
This is arguably the most exciting part of the entire project! With your mesh-covered cone shaped and potentially painted, you can now begin the magical process of decorating. Start by carefully weaving your Christmas lights through and around the chicken wire. You can wrap them on the outside for a bold glow or nestle them slightly inside the mesh for a softer, more diffused light. Experiment with different patterns until you achieve the desired effect. The beauty of the wire mesh is that it provides ample points for securing lights and ornaments without the need for additional hooks or clips. Let your imagination soar as you envision the final look of your unique tree.
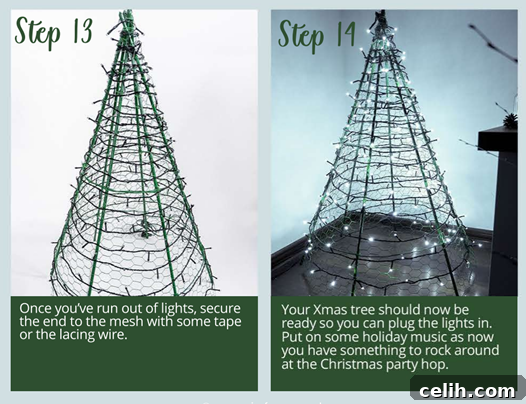
Step 7: Final Touches and Display
With the lights in place, it’s time for the finishing touches. Begin adding your chosen ornaments, ribbons, bows, and any other decorative elements. Use thin lacing wire or small pieces of tying wire to secure them firmly to the chicken mesh. Consider a star or unique topper for the apex of your tree. Once fully decorated, place your magnificent wire Christmas tree in its designated spot – whether it’s brightening your living room or welcoming guests in your garden. If placed outdoors, ensure it is securely anchored to prevent strong winds from displacing it. Step back and admire your handiwork; you’ve created a truly unique and personalized piece of holiday decor!
Creative Decoration Ideas for Your Wire Tree
The true magic of a wire Christmas tree lies in its incredible adaptability to various decorative styles. Here are some ideas to inspire your creativity:
- Classic Elegance: Adorn your green or silver-painted wire tree with warm white LED lights, metallic silver and gold ornaments, and sheer white or silver ribbons. Add a few crystal accents for an extra touch of sophistication.
- Rustic Charm: For a cozy, natural look, wrap your wire tree with burlap ribbon. Decorate with pinecones, dried orange slices, cinnamon sticks, and small, warm-toned battery-operated fairy lights.
- Vibrant & Modern: Spray paint your wire tree in a bold color like teal, fuchsia, or electric blue. Then, string it with multi-colored LED lights and hang geometric ornaments in contrasting bright hues.
- Nature-Inspired Wonderland: Weave artificial evergreen garlands or flexible branches through the wire mesh. Add faux berries, small artificial birds, and even some faux snow spray for a magical winter scene.
- Whimsical & Playful: Decorate with oversized candy canes, colorful balls, playful character ornaments, and brightly colored tinsel garlands. This style is perfect for families with young children.
- Minimalist Chic: Leave the wire natural or spray-painted white. Simply wrap it with a single strand of delicate, warm white fairy lights for an understated yet elegant glow.
Don’t be afraid to mix and match elements to create a look that is uniquely yours. The open structure of the chicken wire allows light to shine through beautifully, creating stunning silhouettes and adding depth to your decorations.
Maintenance and Longevity of Your Wire Tree
One of the significant advantages of a DIY wire Christmas tree is its durability and potential for multi-year use. To ensure your creation lasts for many festive seasons, consider these maintenance tips:
- Seasonal Cleaning: Before packing it away, gently wipe down your tree to remove any dust, dirt, or debris. For outdoor trees, a light rinse with a hose and gentle scrubbing can remove stubborn grime. Ensure it’s completely dry before storage to prevent rust or mildew.
- Careful Storage: If your tree is collapsible or can be disassembled, do so carefully according to its construction. If it’s a rigid structure, find a dry, protected space like a garage, shed, or attic where it won’t be exposed to extreme temperatures or moisture. Covering it with a large plastic sheet or tarp can protect it from dust and pests.
- Light Refreshment: Each year when you bring out your tree, inspect the lights and wiring. Replace any burnt-out bulbs or damaged strands. You might even consider giving the wire structure a fresh coat of spray paint to refresh its color or change its look entirely.
- Decoration Care: Store your ornaments and lights separately in protective containers to prevent breakage and tangling. This will make next year’s decorating process much smoother.
By taking a few simple steps, your handmade wire Christmas tree can become a cherished part of your holiday traditions for years to come, offering a sustainable and beautiful focal point for your festive celebrations.
Enjoy having your very own alternative wire Christmas tree! We hope you found the process of making this project fun and creatively fulfilling, and that you’ll be absolutely delighted with the results. This festive season, let your unique wire tree be a beacon of your creativity and holiday spirit. Happy holidays and joyful crafting!
Love being creative and looking for more inspiration? Check out more ideas for alternative Christmas trees or discover quick and easy DIY Christmas decorations to complement your new creation.